

The Ultimate Guide to Gemstone Color Electroplating: Process, Equipment, and Techniques
Have you ever marveled at a quartz crystal shimmering with an iridescent rainbow glow, or admired a raw gemstone perfectly encased in a polished gold border? These stunning effects are achieved through a specialized process loosely referred to in the jewelry industry as gemstone color electroplating.
However, there is a scientific catch: natural gemstones are insulators; they do not conduct electricity. Therefore, traditional electroplating cannot be applied directly to a raw stone. To achieve these mesmerizing colored metallic effects, artisans rely on two primary techniques: Vacuum Vapor Deposition (for colorful Aura effects) and Electroforming (for solid metal borders).
In this comprehensive guide, we will break down the entire workflow, the exact equipment you need, and the step-by-step processes for both methods.

Vibrant Aura Quartz created through titanium vapor deposition
Method 1: The "Aura" Process (Physical Vapor Deposition)
When people ask about "color electroplating" on gemstones to get vibrant pinks, blues, and iridescent rainbows, they are actually referring to Physical Vapor Deposition (PVD). This process bonds vaporized metals (like titanium, gold, or platinum) directly to the crystal's lattice at a molecular level.
Essential Equipment for PVD Coating
To perform this high-tech coloration, you cannot use a standard home electroplating kit. You will need industrial-grade equipment:
- Vacuum Chamber / PVD Coating Machine: A highly specialized machine capable of creating a near-perfect vacuum.
- Heating Elements: To heat the crystals to extremely high temperatures (often up to 871°C or 1600°F).
- Pure Metal Foils/Powders: Titanium (produces rainbow/blue), Gold (produces Aqua Aura), Indium, or Niobium.
- Ultrasonic Cleaner: For flawless pre-cleaning.
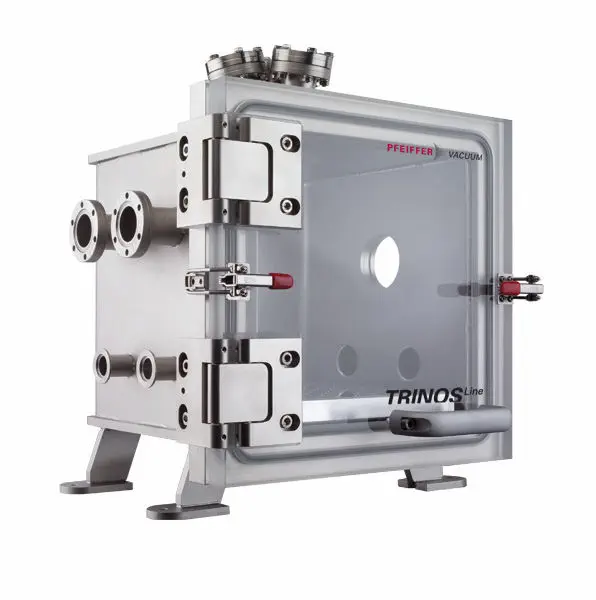
An industrial Vacuum Chamber used for PVD coating on gemstones
The PVD Color Coating Process: Step-by-Step
- Flawless Cleaning: The gemstones are placed in an ultrasonic cleaner. Any speck of dust or finger oil will cause the coating to fail.
- Loading the Chamber: The clean stones are carefully arranged on racks inside the vacuum chamber.
- Creating the Vacuum: All air is sucked out of the chamber to prevent oxidation and interference.
- Heating the Stones: The internal temperature is raised significantly to expand the crystal lattice.
- Metal Vaporization: The chosen pure metal (e.g., Titanium) is introduced and vaporized using an electrical charge.
- Molecular Bonding: The metal vapor coats the stones, fusing with the crystal's surface to create a permanent, colorful metallic sheen.
- Cooling Down: The stones are slowly cooled to prevent cracking from thermal shock.
Method 2: Gemstone Electroforming (Metal Plating)
If your goal is to add a solid color metal (like copper, silver, or 24k gold) to specific parts of a gemstone-such as creating a metal bail or a rustic metallic border-you will use Electroforming.
Essential Equipment for Electroforming
This setup is much more accessible for independent jewelers and small studios:
- DC Power Supply (Rectifier): Usually a 3-Amp to 5-Amp adjustable power supply.
- Electroforming Bath (Beaker): A glass beaker to hold the chemical solution.
- Electroforming Solution: Typically an acid-based Copper Sulfate solution.
- Conductive Paint: Graphite or copper-based paint (crucial for making the stone conductive).
- Anode (Metal Source): Pure copper wire or copper piping.
- Cathode Wire: Thin copper wire to suspend your gemstone.
- Safety Gear: Nitrile gloves, safety goggles, and a respirator mask.
The Electroforming Process: Step-by-Step
- Designing and Sealing: Clean the gemstone. If the stone is porous or soft (like opal or fluorite), coat it with a liquid latex or clear sealant to protect it from the acidic bath.
- Applying Conductive Paint: Paint the areas of the stone where you want the metal to grow using graphite conductive paint. Let it dry completely.
- Creating the Rig: Wrap a thin copper wire around the painted area of the stone. This wire will act as the cathode.
- Setting up the Bath: Fill your beaker with the copper electroforming solution. Coil your pure copper anode around the inside edges of the beaker.
- Connecting the Power: Connect the positive (+) red lead from your power supply to the copper anode. Connect the negative (-) black lead to the wire holding your gemstone.
- The Plating Process: Submerge the gemstone into the solution. Turn on the power supply to a very low setting (around 0.10 to 0.20 amps per square inch of painted area). Leave it in the bath for 12 to 24 hours. The metal will slowly "grow" over the conductive paint.
- Polishing and Finishing: Remove the stone, neutralize it in a baking soda and water bath, and polish the new metal border.
(Optional) Color Plating: Once you have a solid copper base, you can now easily electroplate it with a flash coating of Gold, Silver, or Rose Gold using standard jewelers' plating solutions!

The final result: a beautiful gemstone 925 Sterling Silver Earring
Safety First: Handling Chemicals and Electricity
Whether you are exploring PVD technology or setting up a home electroforming studio, safety is paramount. Electroplating involves strong acids (like sulfuric acid in copper baths) and electrical currents. Always work in a highly ventilated area, wear appropriate PPE (Personal Protective Equipment), and responsibly dispose of chemical waste according to your local environmental regulations.
Conclusion
"Gemstone color electroplating" is a fascinating intersection of nature, chemistry, and art. Whether you are captivated by the vibrant, magical hues of Aura Quartz created in a vacuum chamber, or the earthy, metallic embrace of electroformed jewelry, understanding these processes opens up a new world of appreciation for gemstone artistry.
Are you ready to start your gemstone crafting journey? Ensure you invest in high-quality equipment and always prioritize safety.


